Nursery Rhyme Blocks from Uncle Goose
 I am constantly on the lookout for cool new gadgets, manipulatives, and resources to use in my classroom. No matter where I go I somehow always find myself browsing through children’s books and toys looking for a way to adapt them for the music room. I love to jot down ideas about interesting new ways to use household items or Dollar Spot finds for music instruction. You never know where inspiration will strike and it’s always great to look for new ways to reinvigorate learning in your classroom.
Last year as I was browsing through a children’s gift shop looking for cool toys and books for my nephew I came across the most amazing thing: wooden blocks with nursery rhymes printed on the side. I was immediately intrigued and picked them up to get a better look. The blocks came from a company based out of Grand Rapids, Michigan called Uncle Goose. It turns out that the company makes amazing wooden block resources and I ended up buying more than just the nursery rhyme blocks but came away with resources for centers, ukulele, guitar, and lots more! Read on to see how I use these fun resources in my classroom!
Wooden Blocks for the Music Room
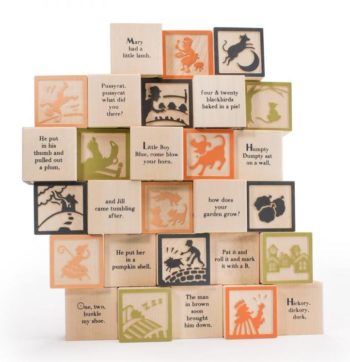 It was almost an accident that I found this cool resource. This children’s bookstore had a whole wall of cool wooden toys, games, and blocks. I remember playing with wooden alphabet blocks as a kid at my grandma’s house. It was so much fun to stack, tumble, and rearrange the blocks into words and patterns. I think it was that nostalgia that made me stoop down and look at the colorful blocks in the store. I found alphabet blocks in a variety of colors and styles. There were original block set with upper and lower case letters which is the sort of thing you might expect to see. Then I found wooden blocks with Greek, French, Danish, and even Arabic letters. They were printed in bright colors and were a very nice quality. Then I saw blocks that looked like barnyard animals, constellation patterns with little stars, and another set with bright flowers. There were sight words and graphic designs and nautical flags and a lot more!
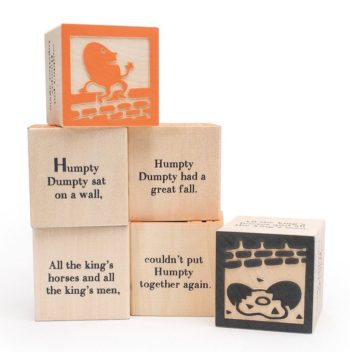
It was then that I noticed a set of blocks with nursery rhymes. Each block features a short nursery rhyme and pictures that go along with it. Two sides of the block have images that represent characters or story elements from the rhyme. For example, the Wee Willie Winkie block has a picture on one side of a boy in a nightgown and a picture on the opposite side of little houses in a village. The other sides of the cube tell the story in four short phrases so that the whole rhyme isn’t on one side of the block. The block set I saw in the store at had 28 nursery rhymes in all and came in beautiful orange, blue, and green colors. I knew I had to learn more!
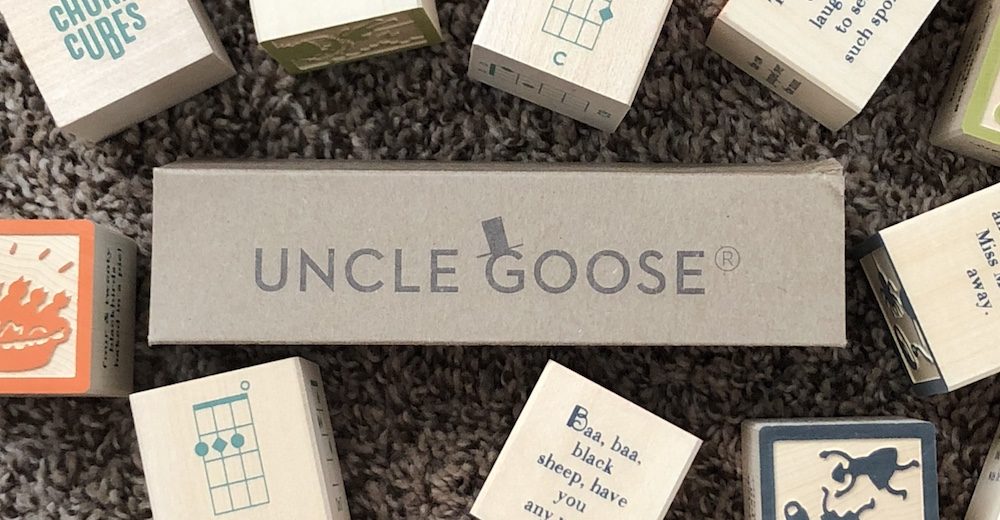
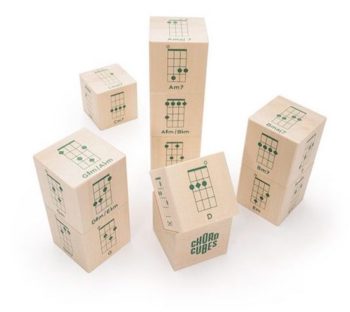
I went home and did some digging online to find that Uncle Goose has several different block sets that are perfect for the music room. Aside from their Nursery Rhyme Blocks (which you can get in the full 28 block set or in a “favorites” set of only 9), they have two sets of blocks called “Chord Cubes” that feature guitar chords and another set that uses ukulele chords. The stringed instrument blocks feature one letter per block so that the block with C chords will get C, Cm, C7, Cm7, C9… you get the idea. The chord cubes also come with a funky little block called a “v-tray block stand” with a diagonal cut out that serves as a stand. That way you can prop up the chord you’re working on so that your hands are free to play your instrument.
Using Wooden Blocks in Your Classroom
 The wooden blocks are super cool to have and look at, but how should you use them in your classroom? I know some of you might be thinking, “There are only 28 blocks in a set, so does each kid get one? What if I only get the set of 9, how can I make that work for my class of 30 kids?” I also thought of that issue and came up with a way to use the blocks and rotate through so that I don’t have to buy a ton of blocks but can still use them effectively.
Let me start by saying that I love teaching nursery rhymes but always feel like I don’t have enough time to do so. If you’re really going to flesh out a nursery rhyme, tell it from start to finish, and add a little activity or game then you don’t really have time to do to many rhymes per class. These nursery rhyme blocks really help with that. I like to use the blocks when I’m doing centers and have students interact with them in that small group setting. I think it’s more effective to use them in centers but I don’t use them in ALL of my centers. If I’m planning out 8 centers, maybe two are rhythm activities, two are melodic reading, one is listening, one is iPads, and two are nursery rhyme blocks. Then not ALL the students are using the blocks at one time meaning that I don’t have to buy two or three sets of blocks.
Here’s one way that I use the nursery rhyme blocks in small groups or centers. I put three or four blocks in each center and ask students to read through and find the beginning of the nursery rhyme. Since four of the six sides of the block have words of the rhyme, students have to read through to figure out where the story starts and ends. Reading and ELA teachers will love you for doing an activity like this where kids have to read through and then use critical thinking skills to identify the beginning, middle, and end of the story.
 Once kids have put the phrases of the block/rhyme in the proper order you can ask them to do other things. On a worksheet or white board you can have students name the characters in the rhyme or explain the plot. Students can categorize whether the characters are children, young adults, or elderly adults. You could have them say the rhyme with their neighbor or ask them to sing the rhyme. Really there are a ton of things that they can do after they’ve learned the rhyme. Honestly, I’m just happy to have students exposed to they nursery rhymes at all so all these little extra tasks are icing on the cake. I think it’s totally okay to put 5 or 6 blocks in a center and have the kids read through and just learn nursery rhymes without any further tasks.
I also think that the best way to us the Chord Cubes is to put them into centers. Let’s say you’re doing a set of ukulele centers with your fourth or fifth graders. Out of eight centers maybe two could be popular songs with chord symbols for the kids to play, two could be chord progressions, two could be “build your own song” where you have pictures of known chord symbols and kids turn them into a song, and then two centers with the chord cubes. At the chord cubes center I would have a “roll a chord” station where kids roll the cube like dice and whatever ends up on top the student has to play. Maybe they work in pairs or group of three to figure out each chord. Unless each kids knows all the possible chords of the ukulele they are bound to come across a chord that’s new or interesting to hear.
Using the Blocks to Build Daily Lessons
These are just a few ideas on how to use these cool resources but there are so many other possibilities. Maybe for each class you reach into the bag and pull out a new block and then read the rhyme to the class. If it’s a rhyme they know they can say it along with you and if not they can learn the rhyme. It would take 3 or 4 minutes for each class period and by the end of the year they’d be familiar with a ton of fun rhymes.
How do you think you could use these chord blocks in your classroom? Would you make them a part of your daily routine, create a new set of lessons around them, or put them into centers? If you share your idea in the comments section below then lots of other educators can read the ideas and use them in their own classroom!


Leave a Reply