Classroom Organization – Save Space and Sanity
 Music teachers who have ever experienced K-5 education (and those of us who have experienced K-8 education) can tell you that a quick switch and easy transition at the end of class is vital to your sanity. This year I start every day with two middle school classes followed by fourth grade and then second grade. After lunch my classes go fifth grade, 1st grade, 3rd grade, Kindergarten.
Each of my classes requires a different sort of room setup and different resources located throughout the room. Middle schoolers need chairs in a certain order, fourth graders don’t need the chairs, but need an easy way to find their spot in the seating chart, and second graders might need a circle or stations or scattered formation or something totally different. I remember one year I taught 5th grade followed (with no passing time) by kindergarten.
The mental shift that has to take place for you to be able to think in the right way for each grade level takes enough effort. Why waste time thinking about chairs, room setup, everything else?I had an administrator once who implored us to build up routines and expectations so that the kids did all the “heavy lifting.” For instance, let students put away chairs while you start your class transition and teach them how to do it without too much supervision. Instead of collecting papers from each student, teach kids how to stack papers or put them in a designated location where you can deal with them later. Establish routines and procedures and your life will be so much easier.
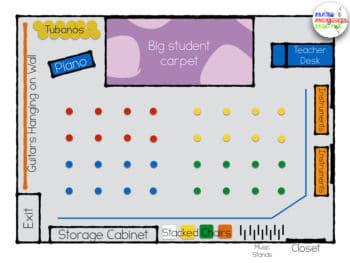
As I said above, I teach music to Kindergarten through 8th grade every day and we have very different needs in each class. I have a small room and NO passing time. In this blog post I’m going to share three things that I’ve done to make my transitions and organization in my class a little bit easier! For reference, here’s an aerial view of my classroom so that you get a better idea of what I’m dealing with. Curious about how big the room is? For size reference, go find your closest closet and imagine all the music room stuff packed in there. ;D Okay… maybe it’s not quite that small, but some days it sure feels like it. That’s why you’ve got to really think about your classroom organization and classroom procedures to save your time and sanity!
#1 – Stacking Chairs – My Organization Nightmare!
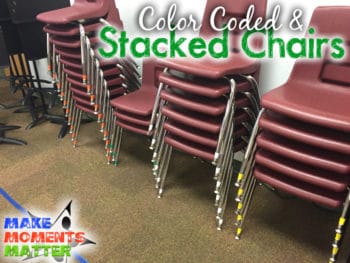
I have 28 chairs in two different sizes (so that they don’t all just stack easily with one another). It takes too much time for me to put all the chairs away on my own. For some reason the middle schoolers couldn’t or wouldn’t take the time to figure out if they had a “big” or “little” chair and would inevitably try and stack them all together unevenly… which lead the the leaning tower of chairs that would teeter and ALMOST fall in the middle of my 4th grade class.
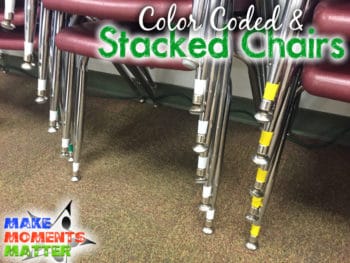
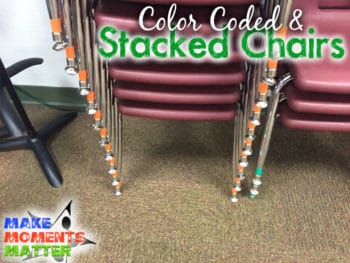
So, I pulled out my colored tape. Some of you might remember how I wrote a whole blog post about how I use tape in the classroom (a nerdy yet hopefully helpful look into my color coded classroom life). I use tape a lot to color code and help make transitions easier. So, I made four stacks of chairs: two stacks of “big” chairs and two stacks of “little” chairs. Each stack had its own color and I taped the bottoms of each chair leg with that color tape. Then I put a little color coded sign on the wall that said something like “10 orange chairs go here.” Middle schoolers might not have been able to figure out big/little on the fly but as soon as I had them follow the color-coding, things magically went a lot smoother. Chairs stacked easily and transitions became a lot smoother. Hooray!
#2 – Making a class circle… in less than an hour
You would think that “stand up and make a circle” would be a pretty easy command to follow. Nope. I learned this lesson early on. Elementary school kids just need help circling up. Either they get distracted by their friends who they want to stand by, or they can’t conceptualize a circle when they’re part of the 2d shape, or their brain is stuck processing information about their favorite Pokemon. Whatever it is, kids have a hard time quickly making a circle.
I have a couple work arounds for this circle conundrum. For little kiddos I’ll often greet them at the door and lead their line in to make a circle. In that instance, presto-chango, the line become a circle with ease. In other instances I can say something like “stand up and grab hands with the person next to you.” If everyone is grabbing someone else’s hand, then we’re in a circle. This takes longer for some groups than others, but usually it works.
My current school is a hornets nest of behavior problems from kinder through middle school. I have to very strategically chart out where kids sit and figure out who they can work with. Going from that fantastic and meticulously-planned seating chart to a “please don’t hit him” circle can be a bit of a mess. I have SitSpots which help divide the kids into four different teams to help with classroom management (I named each team after one of the four instrument families… read how I do this HERE). The SitSpots on the floor help the kids figure out where they sit with ease and I try and group kids who CAN work together well into each family. That way if a student has to leave their assigned spot for any reason, they can probably work well with other kids in their own team/their own area nearby. So, how does this team/section of the class transition into a circle?
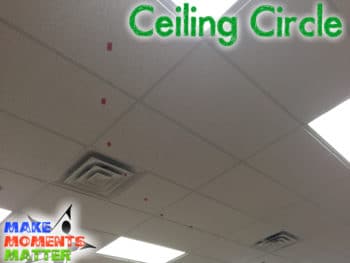
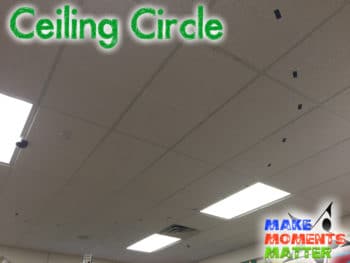
I didn’t want to use tape or velcro to tape a big circle on the floor. With chairs moving across the floor so often, I knew a carefully placed circle wouldn’t last long. And trying to decipher between the tape/velcro for a circle and the 32 sit spots on the floor it would make things more confusing.So instead of adding to the floor, I got out my tape and taped the circle on the ceiling. I used 32 little colorful pieces of tape and made a large circle on the ceiling right above the normal student spots. There are about 8 kids in each instrument family/team and so there are about 8 colorful sit spots that go together in a little section of the room. For instance, the brass family is red and they have 8 red dots right next to each other. When creating the ceiling circle, I took some red tape and taped out 8 spots on the ceiling in one quarter of the circle right above the brass section.
When I ask kids to stand I say something like “stand underneath a piece of tape that matches YOUR instrument family.” The kids in brass would stand up from their red dots and look straight up to find red piece of tape on the ceiling. This way, kids wouldn’t be running across the room to stand by their bestie but would find a colorful spot on the ceiling that matches the color of their spot on the floor.
I’ll admit that this is not perfect. Kids still get confused. The more times that we make a circle this way, the better the process becomes. Sometimes I’ll still say “grab hands” to make sure that our circle turns out right, but for the most part this has been a huge help.
Quick “How-to” — Making a Circle on the Ceiling
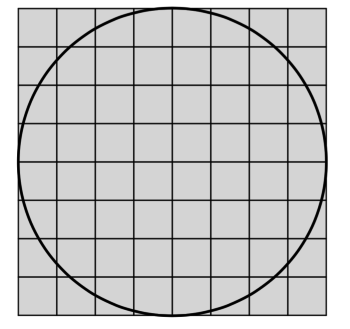 I wanted to make a circle but had NO IDEA how I could free-hand it up on the ceiling. How could I actually make it a circle and not a very out of shape oval? Here’s what I did. I have square ceiling tiles so I found the center point of the circle at the intersection of four ceiling tiles. Counted out 4 squares from the middle (to where I wanted the borders to be) and then went to my computer to superimpose a circle on top of a grid of squares. When I printed that off, I had a guide of where to put the tape to make a circle on the ceiling! On the North/South/East/West edges, the circle meets the grid of squares and tape was easy to put down. For all the places in between the edge points I just followed the picture of where the tape should go down and tried to match that with a spot on my square ceiling tiles.
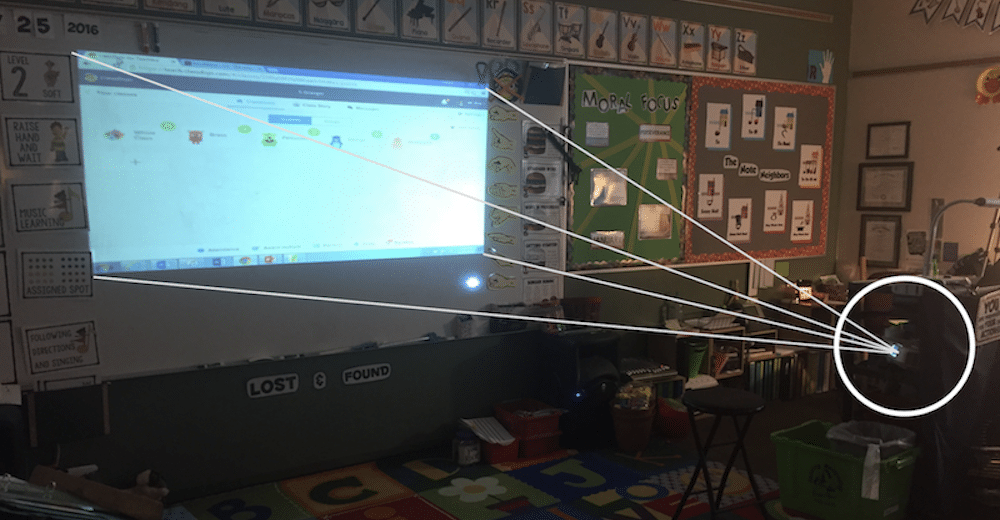
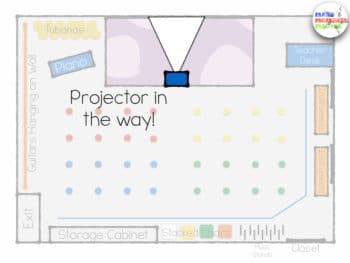
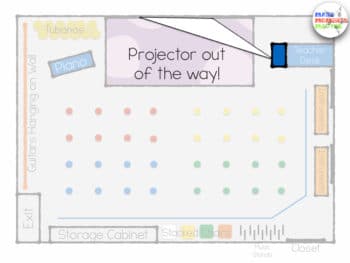
#3 – Projector in the way!
Click images below to see instructions and bigger pictures!
I really hope this blog post gives you some ideas about how to reorganize your room to fit your needs and cut down on transition time. If anything above doesn’t make sense, please leave a comment below so that I can explain better. OR if something you’ve read sparks your interest, leave a comment about how you think you could implement the idea or maybe even make it better. I’d love to hear your ideas!



7 Comments